x
FAQ
Show all
Hide all
- NS Server installation
-
- Installing third-party NS-servers
-
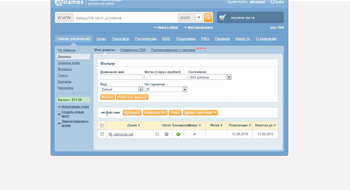
If you have an NS server that is issued by the hosting provider, a subsidiary or any other type of NS server, you should go to "Domains - My Domains" section and click on "Change NS" button by highlighting the domain check box.
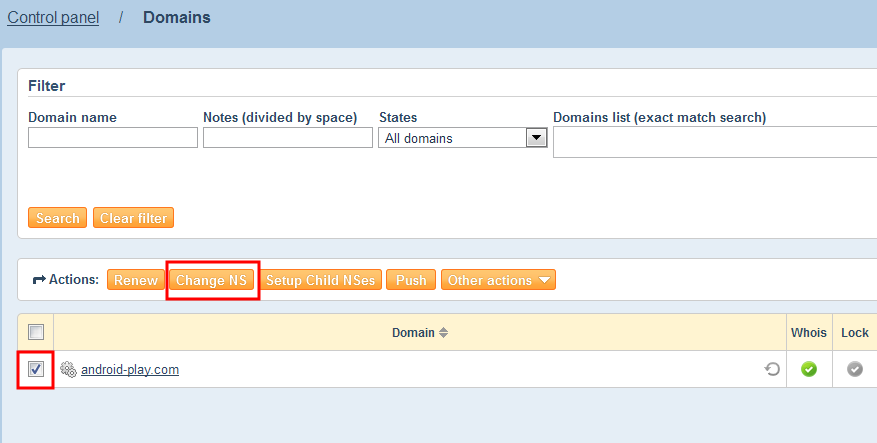
Allow some time for the saved changes to take effect. Information update on main DNS roots may take up to 48 hours.

- Ahnames.com NS-server installation
-
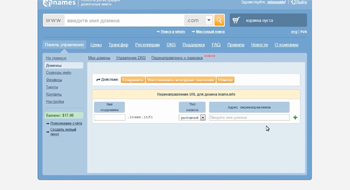
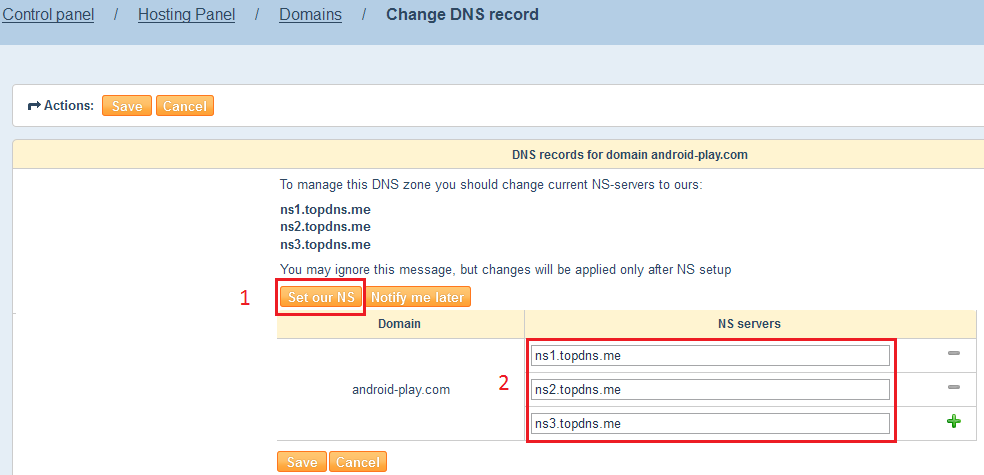
To configure a DNS in the Ahnames.com panel, go to "DNS control" section and click on the "change DNS" button by highlighting the domain check box. The system will offer to install our NS-servers. You'll need to paste NS-server info into specific lines after clicking on "install our NS" button.
Allow some time for the saved changes to take effect. Information update on all servers may take up to 2 hours.
- Creating subsidiary NS-servers
-
To create a subsidiary NS-server go to "Domains — server names" section and click on "Create nameserver" button.
In the window that appears specify the name and IP address. You can write subsidiary servers for any domain when the changes are saved.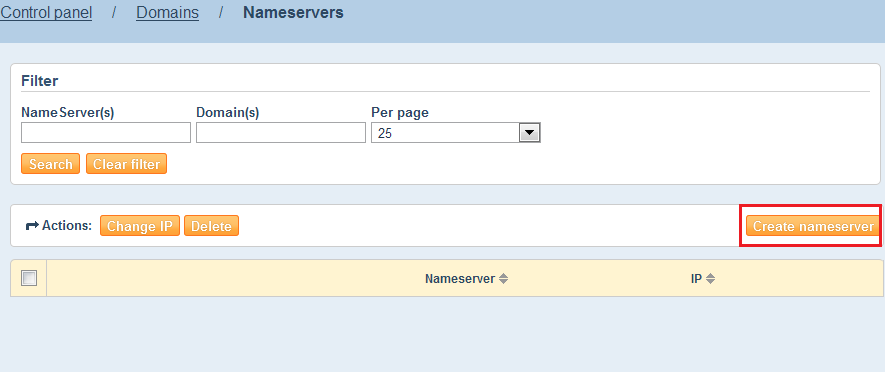
- Setting a DNS in Ahnames.com panel
-
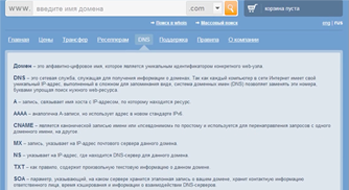
- A-record
-
You need to install our NS-servers to configure the A-record in the Ahnames.com panel.
Installing AHnames NS-servers.
After selecting the A-record type, specify the correct IP address in the line that is shown on the screenshot.
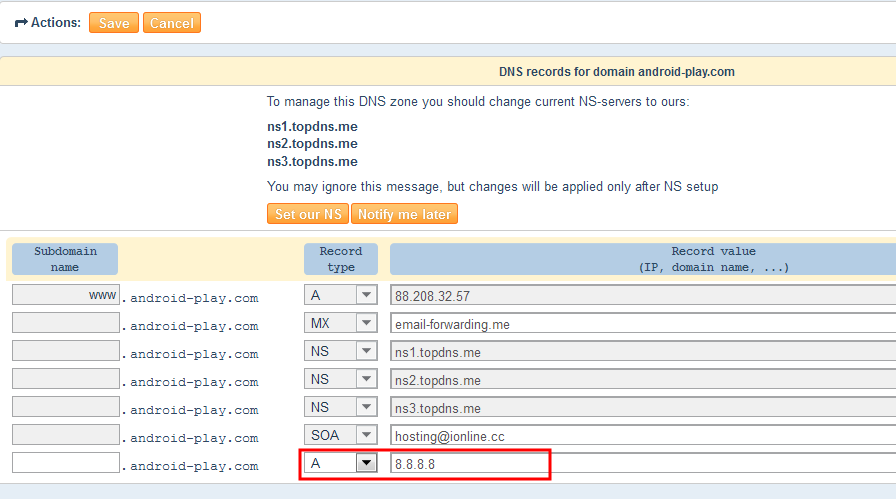
You can also specify IP addresses for Subdomain names if necessary. To do that, the Subdomain name should be indicated as prefix in the specific field. If you need to specify only one IP address for all Subdomain names, write "*" symbol in the "Subdomain name" field.
- MX-record
-
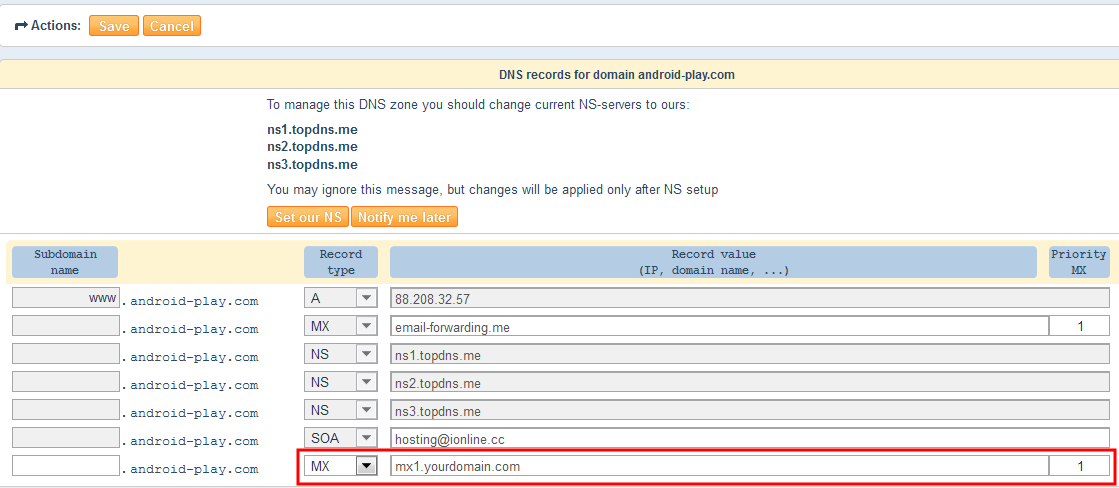
You need to install our NS-servers to configure the MX-record in Ahnames.com panel.
Installing Ahnames.com NS-servers.
After the A-type record is selected, specify the subdomain name, that the record will use and specify the correct IP-address. Next, when selecting the "MX" type record, specify MX priority for the created domain. As a rule, the following priority values are specified for postal server: 10, 20, 30, 40, 50. The closer the value is to 0, the higher its priority is. Mail is processed by a server that has higher priority value. If this server is unavailable, mail will be processed by a server with lower priority.
- CNAME-record
-
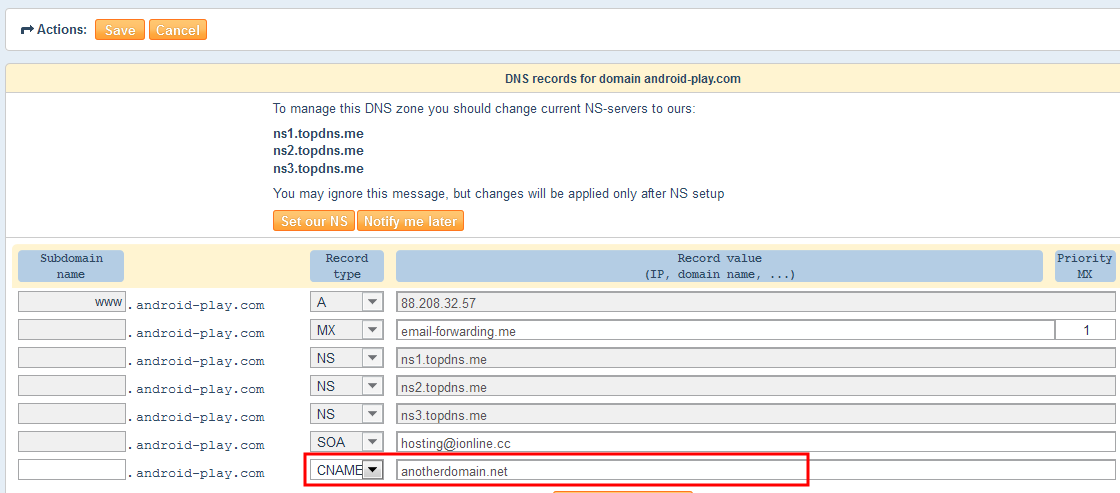
You need to install our servers to configure the CNAME-record in the Ahnames.com panel.
Installing Ahnames.com NS servers.
When CNAME-record is selected, specify the domain that will be used to refer to main domain name or the specified Subdomain name.
- Premium package
-
- SOA-record
-
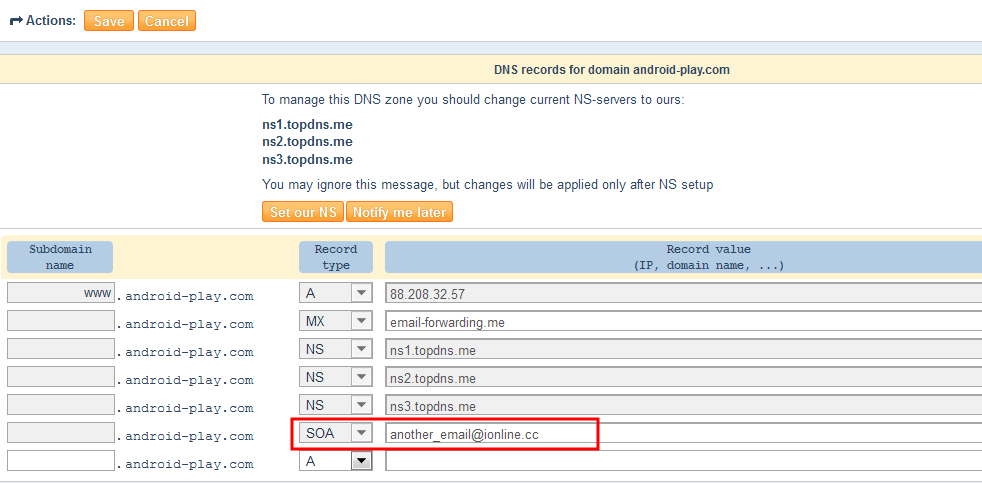
You need to install our NS-servers to configure a SOA-record in Ahnames.com panel.
Installing Ahnames.com NS-servers.
If you have selected the "Premium package" you will be able to edit "Email address" and "TTL" fields.
- URL forwarding
-
You need to install our NS-servers to configure URL forwarding in Ahnames.com panel.
Installing Ahnames.com servers.
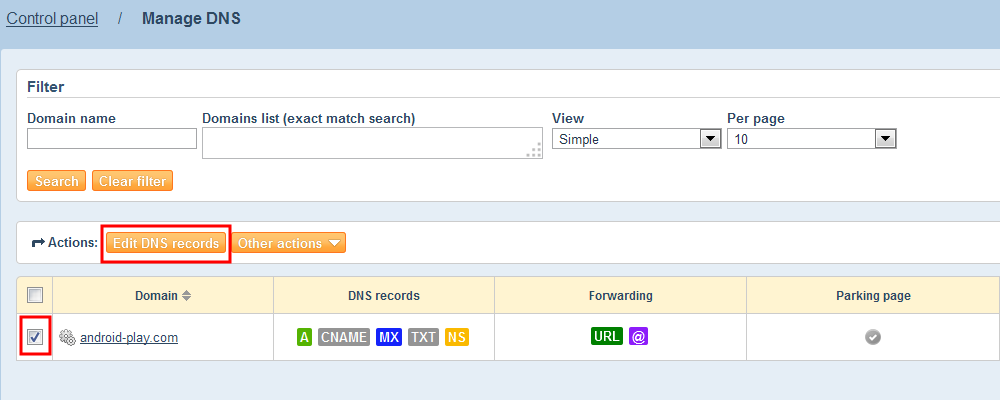
Activate "URL forwarding" option for specific domain In the "Manage DNS" section. Select one or several domains and choose the necessary option in the dropdown window.
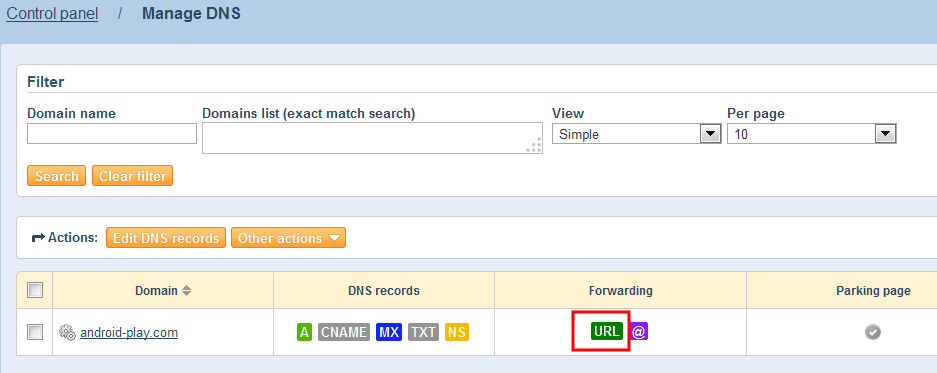
Now you can configure forwarding from your domain to any other website. You can also configure forwarding for Subdomain names or use "*" symbol to indicate any Subdomain name."Forwarding address" allows entering get urls that look like this: http://name/.

The following settings can also be used to forward an URL: 301 — transferred permanently, 302 — transferred temporarily.
- E-mail forwarding
-
You need to install our servers to configure E-mail forwarding in Ahnames.com panel.
Installing Ahnames.com NS servers
Activate the "Mail forwarding" option for necessary domain in the "Manage DNS" section.
Now you can configure mail forwarding from your domain to any existing email address. It is possible to forward mail from a specific user as well as all mail. Use "*" symbol as user’s name to forward all mail.

- Parking page
-
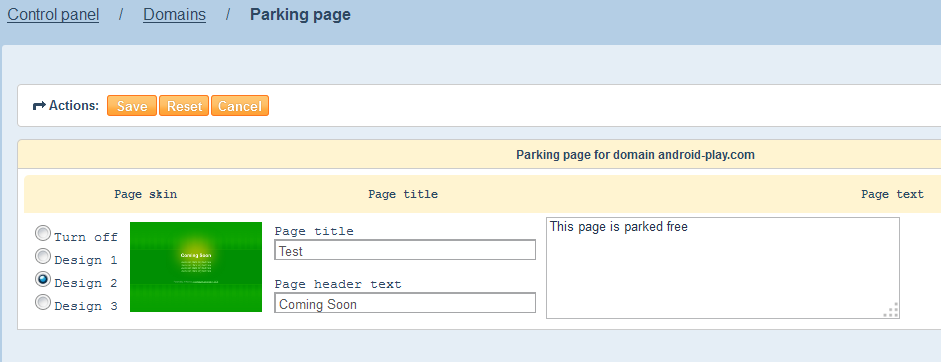
Activate the "Parking page" option for selected domain in the "Manage DNS" section.
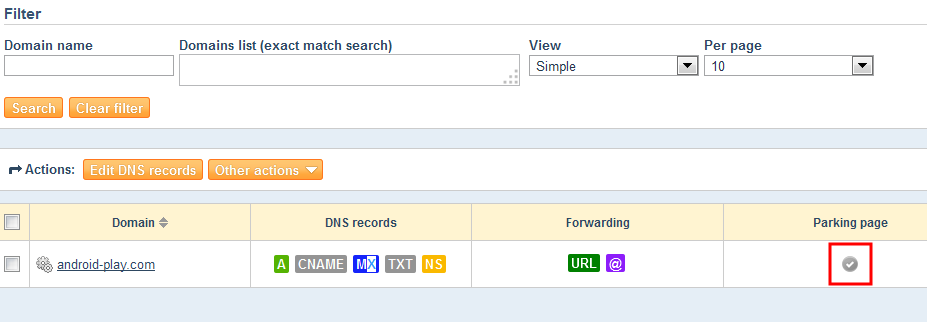
Installing Ahnames.com NS-servers.
Now you can create a parking page. Three design options are available, as well as the possibility to edit the header, title and text from the page (up to four lines).
- Errors and Problems
-
- The "Object does not exist" error during NS-server installation
-
This error means that you want to write values for subsidiary servers that are not yet created.
To create subsidiary servers, please read the "Creating a subsidiary NS-server" guide.
- I have specified NS-servers but my website doesn’t work
-
Please check if domain name is pinging. To do so, write: ping yourdomain.com in the command line. If your server sends answers with correct IP-address, the problem is with your hosting provider.
DNS Server setup
- Transferring domain to other user
-
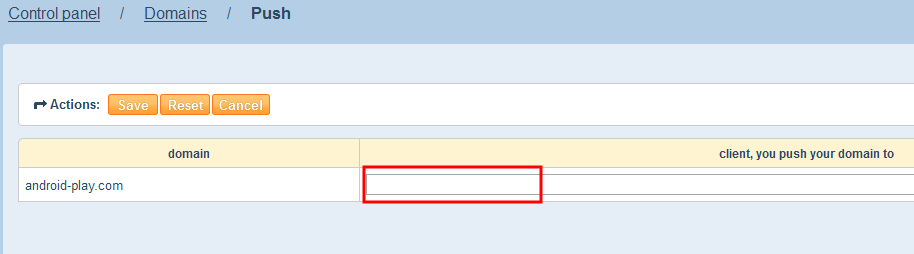
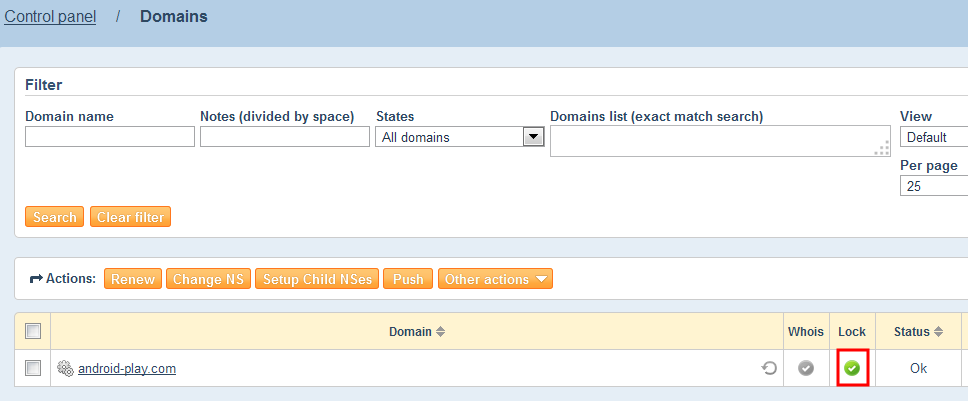
The process of transferring domains between users within one registrar is called Push. If you want to give your domain to other user, you need to unlock domain by clicking on the green checkmark in the "lock" column.
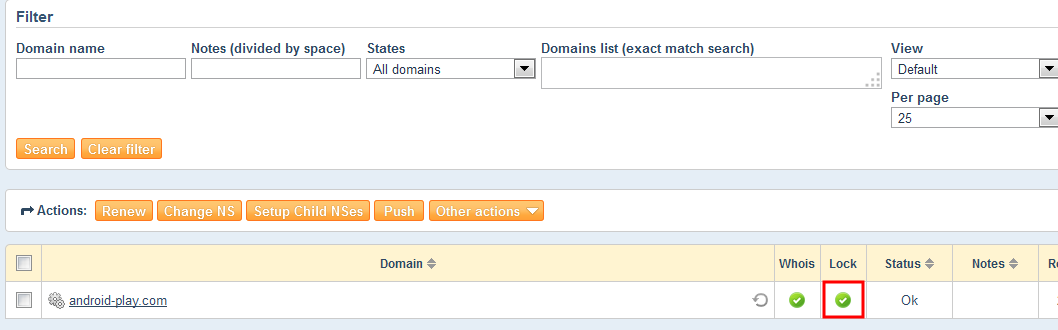
Next you should select one or several domains (1) and click on the "Push" button (2).
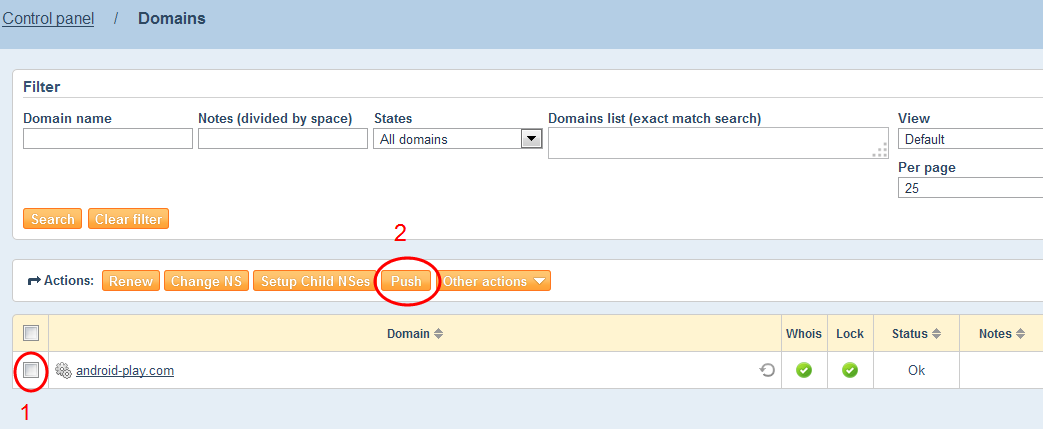
After that, write the login of new domain’s owner in the specific line.
- Transferring domain to other registrar
-
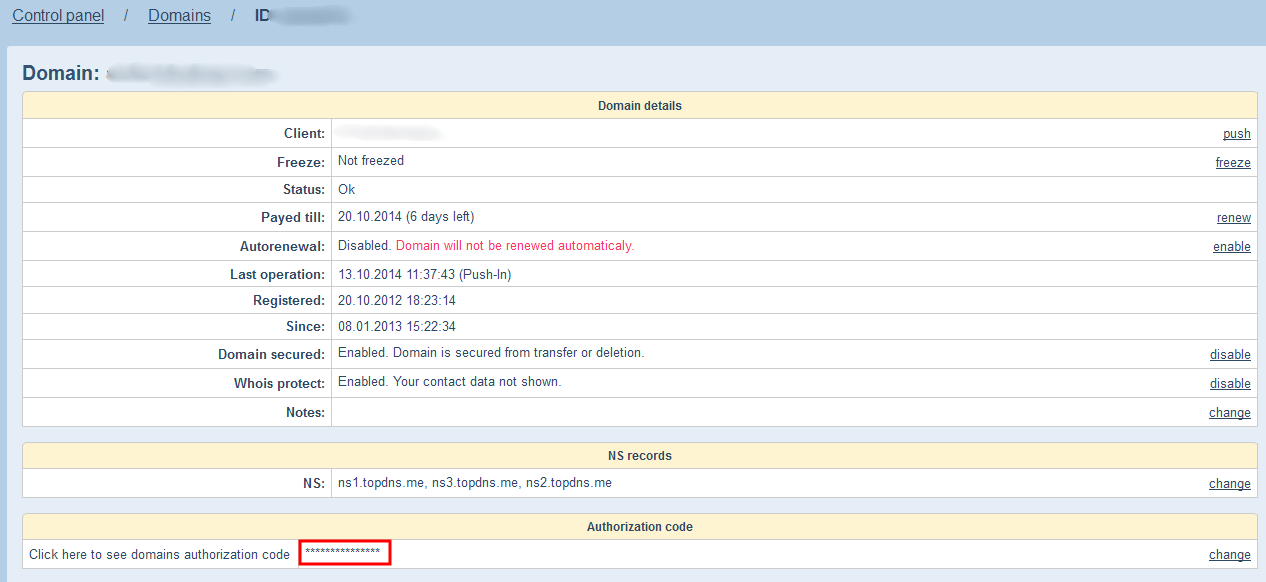
If you want to transfer domains to other registrars, the first thing you should do is to unlock domain by clicking on the green checkbox in the "Lock" column.
Next you need to receive the EPP code. To get the code, open domain control window by selecting the necessary domain in "My domains" section. After that you’ll receive the EPP code in the specific line.
- Transferring domains to Ahnames.com
-
- From Directi
-
-
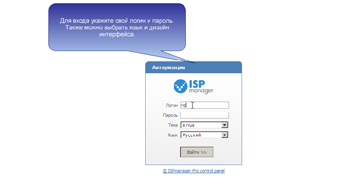
Login to domain control panel.
-
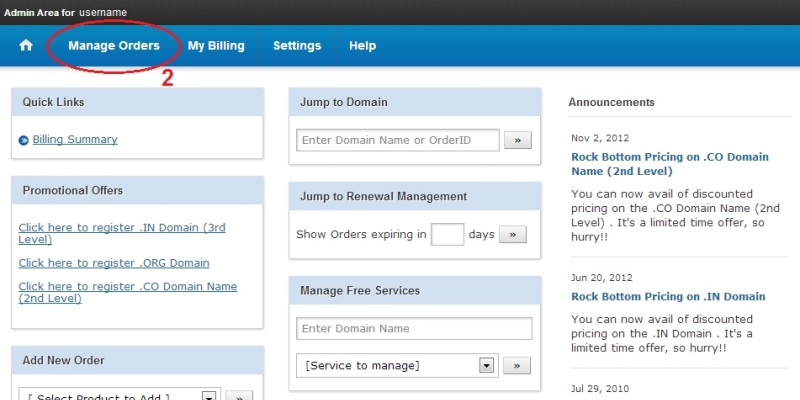
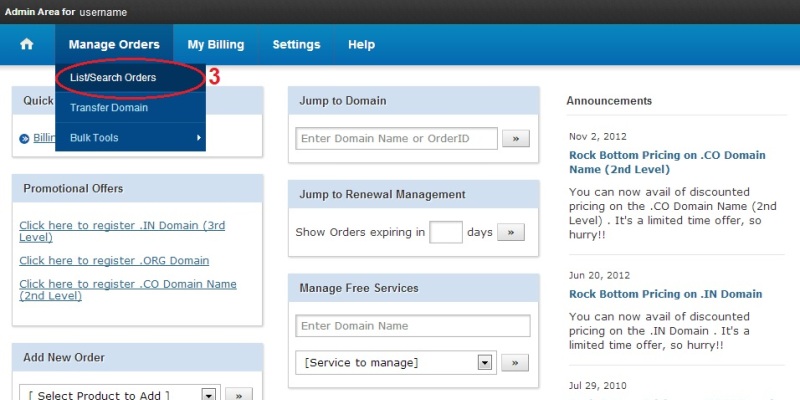
Select the "Manage Orders" section.
-
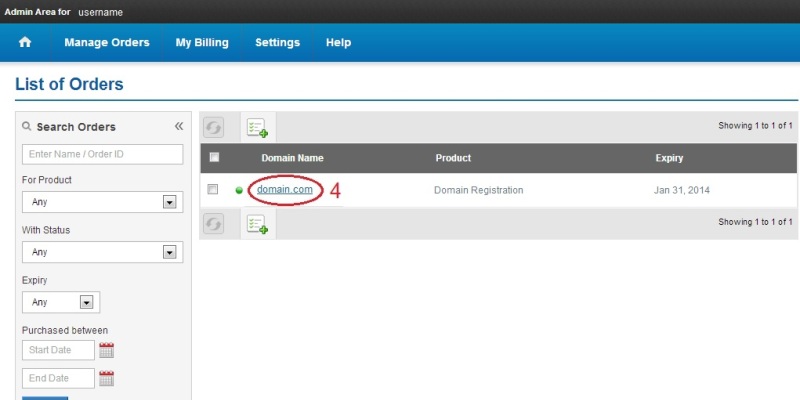
Select the domain that you want to transfer.
-
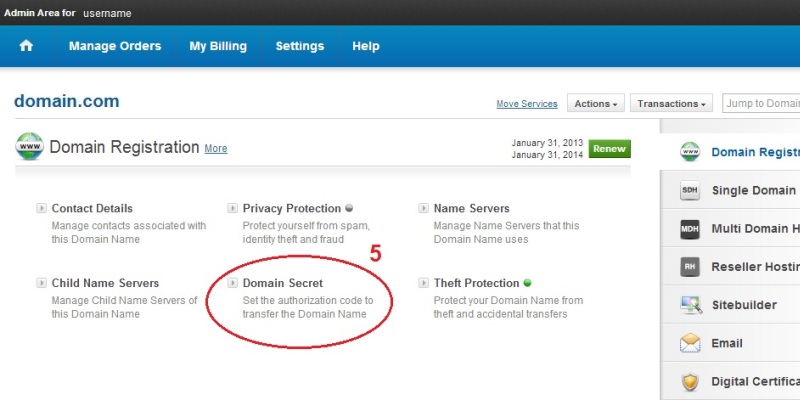
Go to domain management page by clicking on domain name.
-
Click on "Domain Secret" section.
-
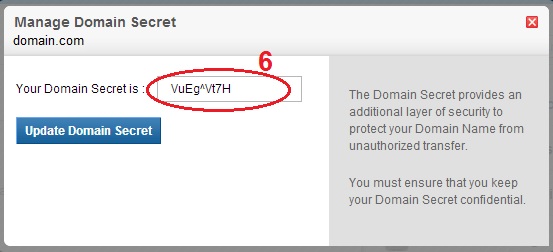
Copy domain code (for its further authorization in our control panel).
-
Login to AHnames domain control panel.

-
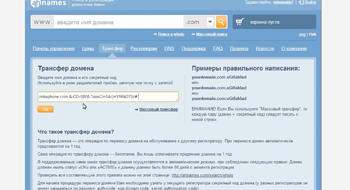
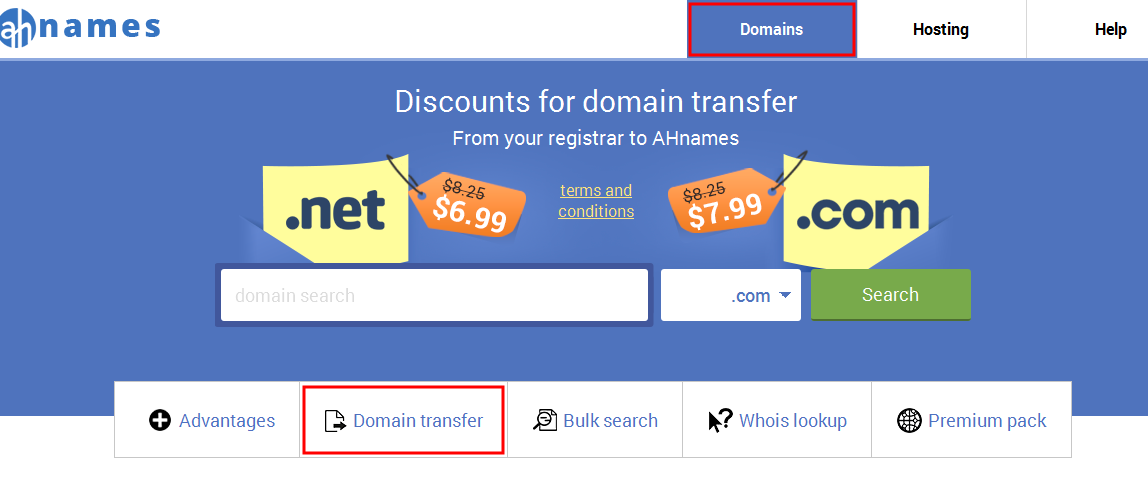
Go to "Domains — domain transfer" section.
-
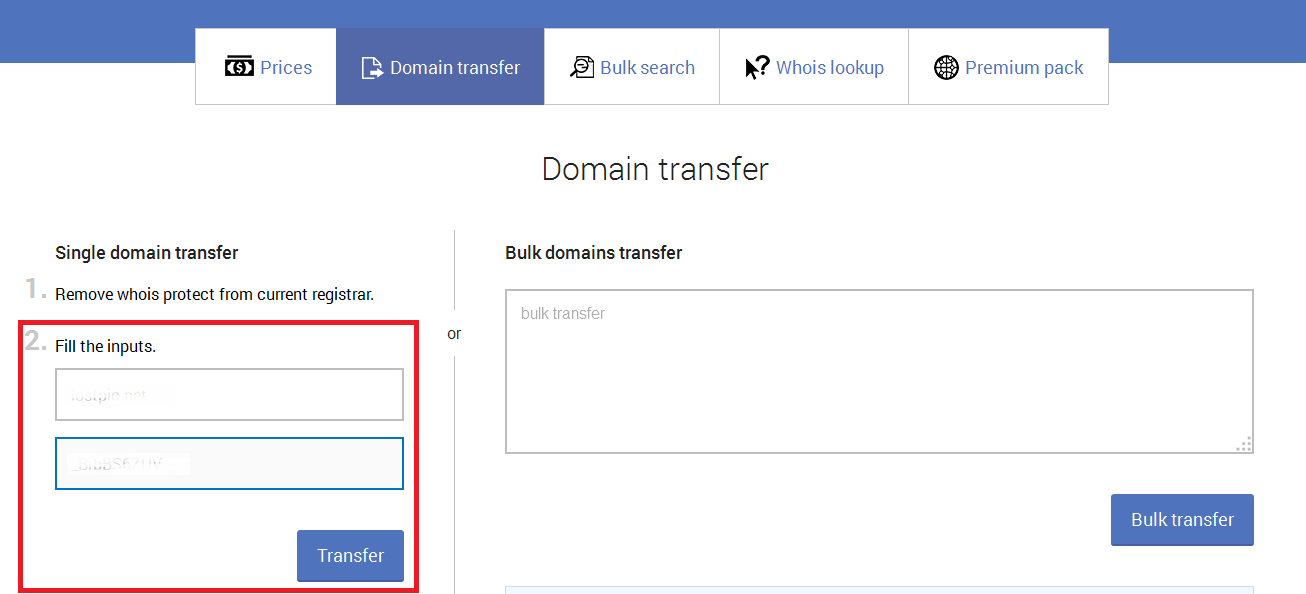
In the window that appears write the domain name and code or use the field for mass domain transfer (separating domain names with comma).
-
Click on "Proceed".

-
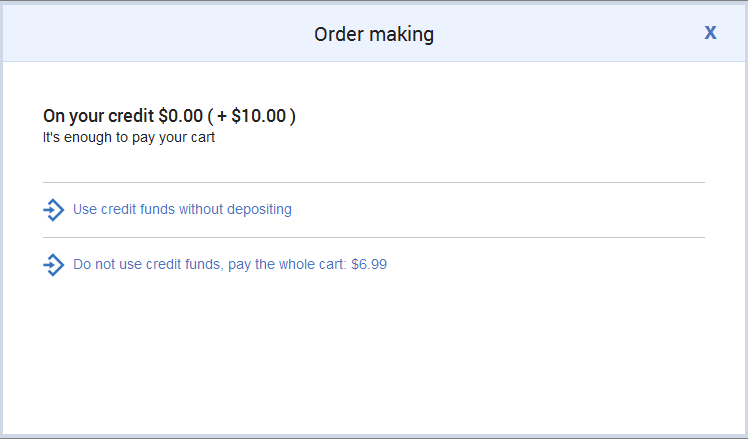
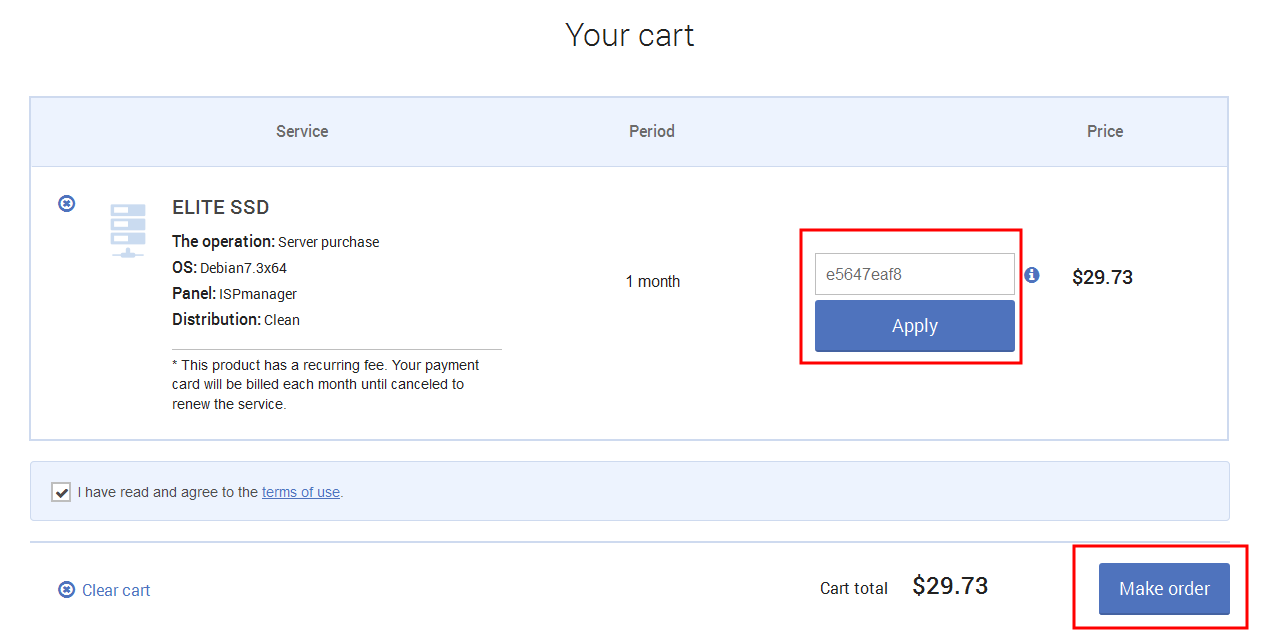
At checkout, click on "Make order" button to pay for domain transfer and other operations.

-
Select the payment method.
-
- From GoDaddy
-
-
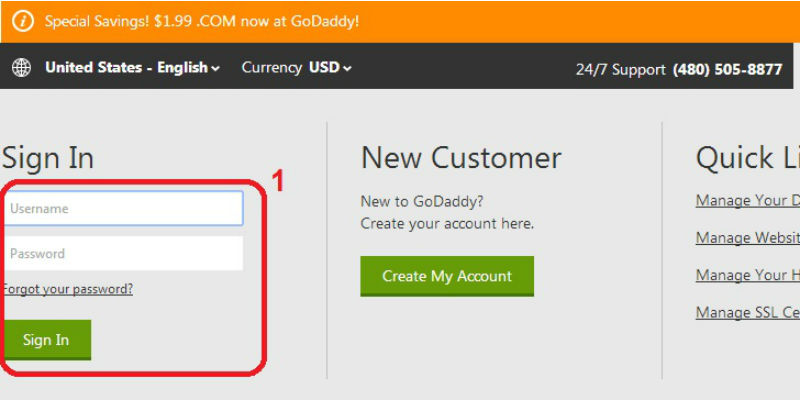
Log in to your http://www.godaddy.com/ domain control panel.
-
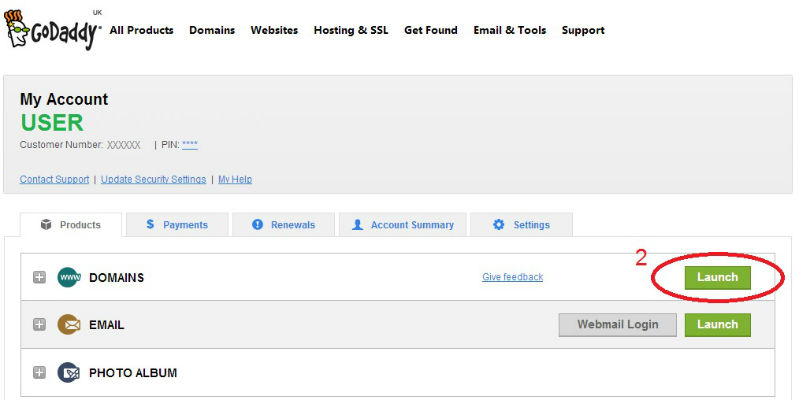
Click on "Launch" next to "Domains" section.
-
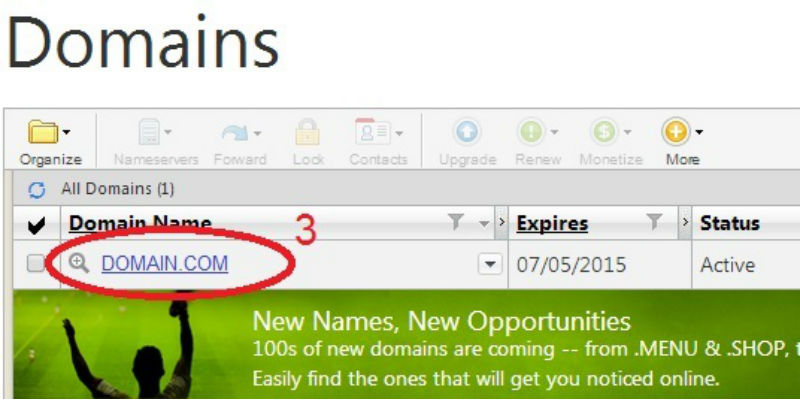
Click on the domain that you want to transfer.
-
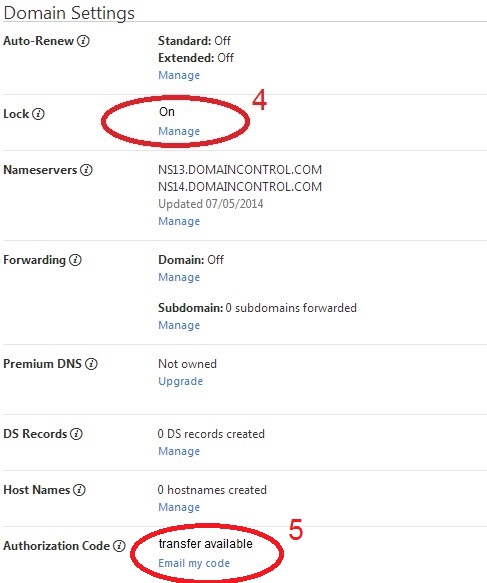
Click on "Manage" link in the "Lock" section (go to the next step if the status says "Locked: Off"). Uncheck the checkbox in the window that appears and click "OK".
-
Click on "Email my code" in the "Authorization Code" section on the same page. The password for your domain will be sent to the email that was specified during domain registration.
-
Copy domain code (for its further activation in our control panel).
-
Login to AHnames domain control panel.
-
Go to "Domains – domain transfer" section.
-
In the window that appears write the domain name and code or use the field for mass domain transfer (separating domain names with comma).
-
Click on "Proceed".
-
At checkout, click on "Make order" button to pay for domain transfer and other operations.
-
Select the payment method.
-
- From Nаme.com
-
-
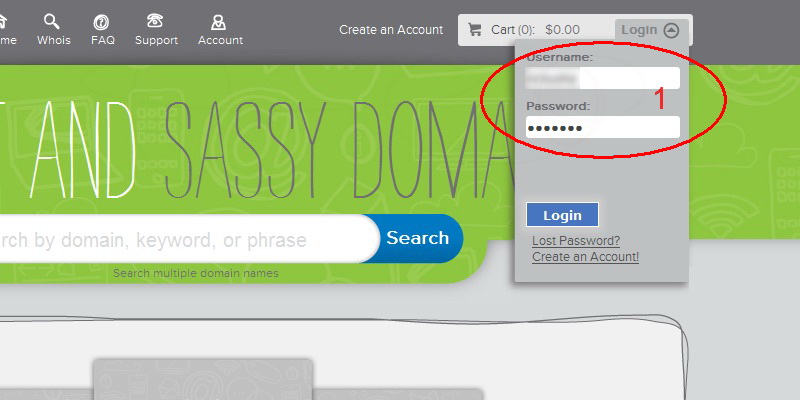
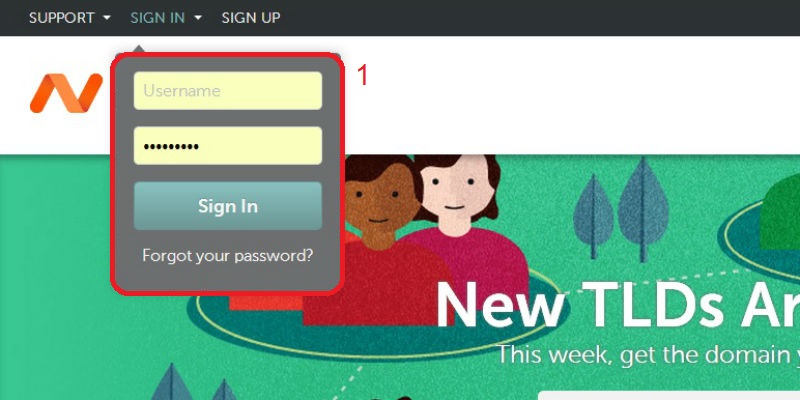
Login to your control panel.
-
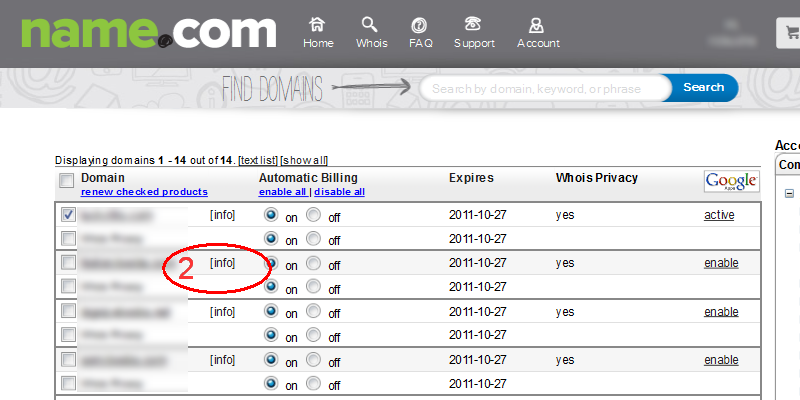
Click on "Info" to view domain’s detailed information.
-
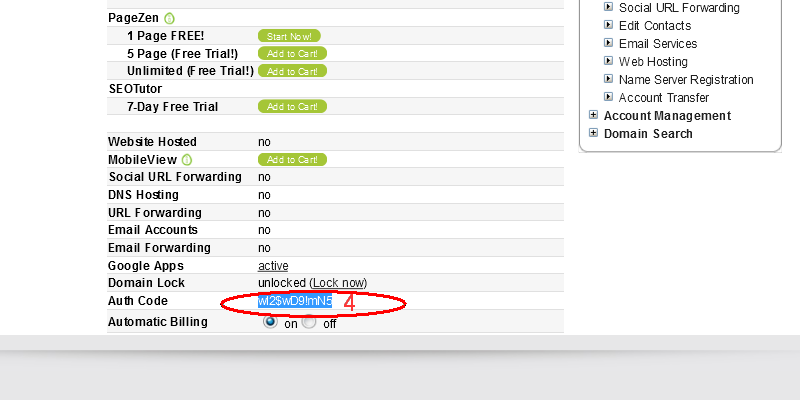
If domain is locked for transfer, click "Unlock now".
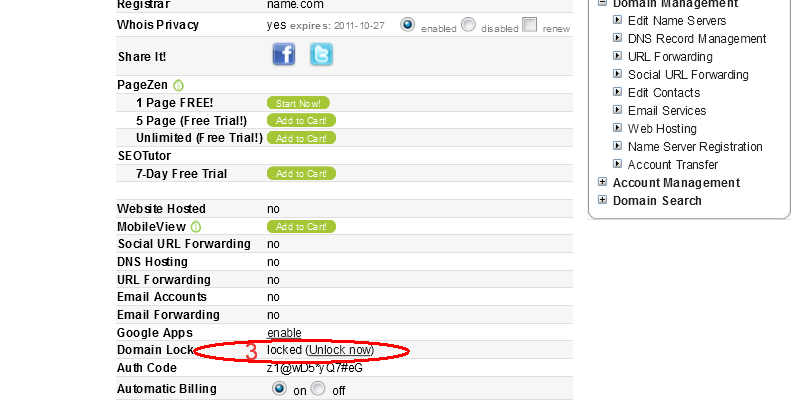
-
Copy the domain authorization code.
-
Log into AHnames domain control panel.
-
Go to "Domains — domain transfer" section.
-
In the window that appears write the domain name and code or use the field for mass domain transfer (separating domain names with comma).
-
Click on "Proceed".
-
At checkout, click on "Make order" button to pay for domain transfer and other operations.
-
Select the payment method.
-
- From Name Cheap
-
-
Log into http://namecheap.com/ domain control panel.
-
In control panel click on "Number of domains in your account".
-
Check the "Edit selected" next to a domain that you want to transfer.
-
Next, click on "Registrar Lock" to allow domain transfer.
-
Check domain status. If the status says "Current Lock: Status "Locked", check the box opposite that says "Release the registrar lock so that the domain can be transferred to some other registrar" and click on "Save changes".

-
If the status is "Current Lock: Status "Not Locked", click on "Get the EPP Code".
-
Enter your password for accessing Namecheap.com panel in the "Authenticate by entering your account password" line.
-
Fill in the feedback field and indicate the reason for transferring domain (optional).
-
Login to AHnames domain control panel.
-
Go to "Domains – domain transfer" section.
-
In the window that appears write the domain name and code or use the field for mass domain transfer (separating domain names with comma).
-
Click on "Proceed".
-
At checkout, click on "Make order" button to pay for domain transfer and other operations.
-
Select the payment method.
-
- Errors and problems
-
- I didn’t receive the transfer authorization letter (FOA)
-
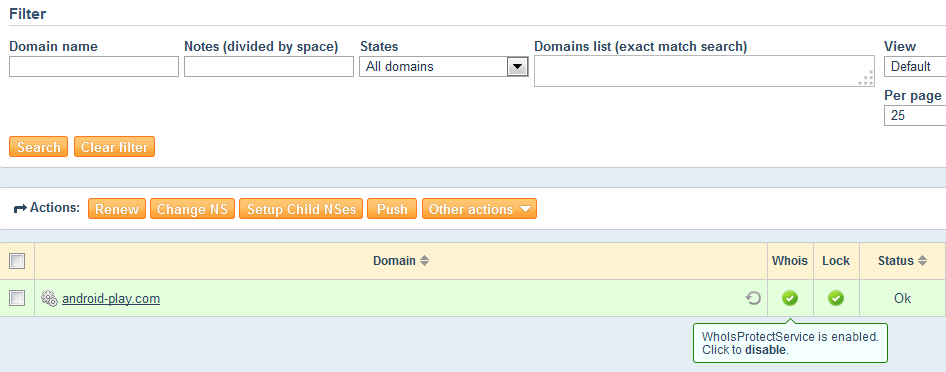
Check to what address the transfer authorization letter was sent. To do so, open domain control window and select the necessary domain from "My domains" tab. The address to which the transfer authorization letter was sent will be shown in the "Status" field. If you see contact@privacyprotect.org or similar address instead of your email, this means that you have not deactivated the Whois Protect service offered by your current registrar. Deactivate the Whois Protect and wait for 10-15 minutes. Then click on "send FOA again" link
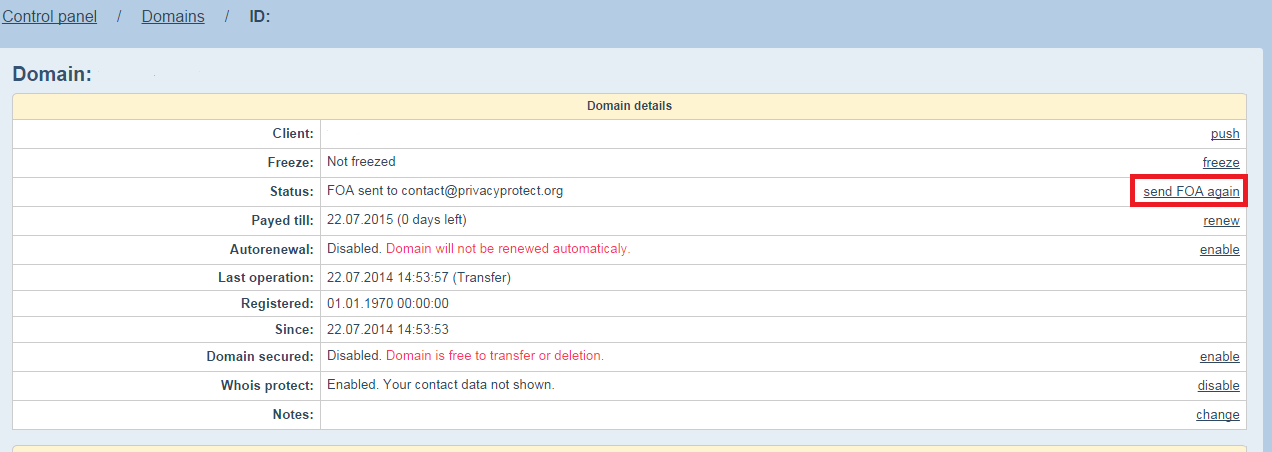
If the status shows your email address, check your spam folder or wait for 5-7 minutes.
- Invalid authorization information Error
-
This error means that the wrong EPP domain code was provided. Copy the EPP code again. If the error repeats, write us a ticket for manual transfer indicating domain name and EPP code.
- Invalid authorization information error
-
This error means that you didn’t unlock your domain from current registrar. Depending on the registrar, this option may be called differently. If you have trouble finding it, contact the tech support of your current registrar or read the transfer FAQ if your registrar is one of the following:
Transfer
Other
- .XXX domain activation
-
To activate an .xxx domain you need to be inspected by the Sponsored Community.
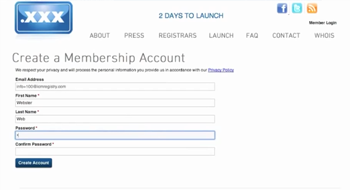
- After registering an .xxx domain you will receive an email from ICM Registry with the registration confirmation link.
- You’ll need to fill out the application form to join the ICM Registry community. Account registration is done once. The next time you register an .xxx domain, you can add it to your existing ICM Registry account.
- You must specify the correct date of birth, address, telephone number and agree to the Sponsored Community terms and conditions to register.
- After completing the registration form, you will receive a call to the specified phone number. A robot will dictate you the Pincode that should be entered in the specific line on the registration page.
- Once the registration is completed, a list of registered domains and your Membership Token will be presented on your profile page. The Membership Token should be sent to the registrar for domain zone activation.
- Pincode
-
Pincode is an additional safety setting for your account’s security. Pincode consists of four randomly generated numbers that will be requested by the system when you need to make changes that can affect the safety of your account.
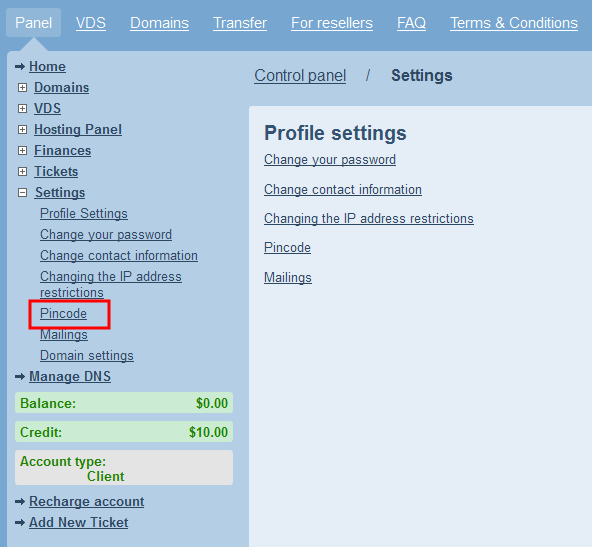
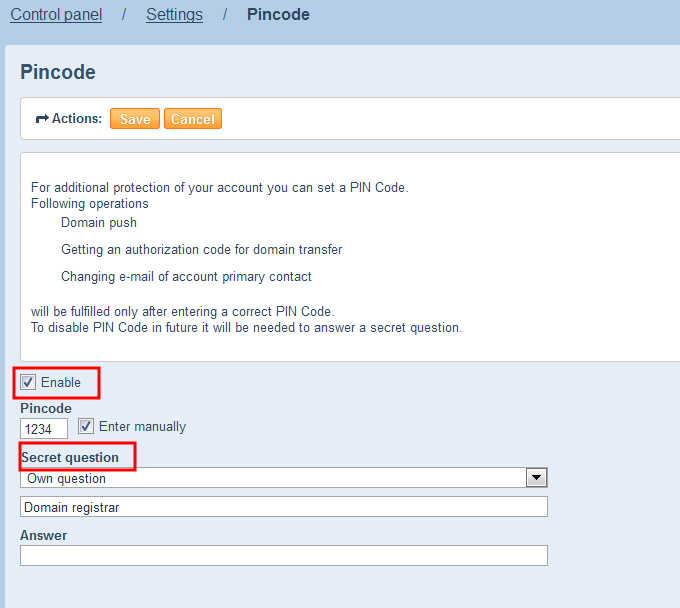
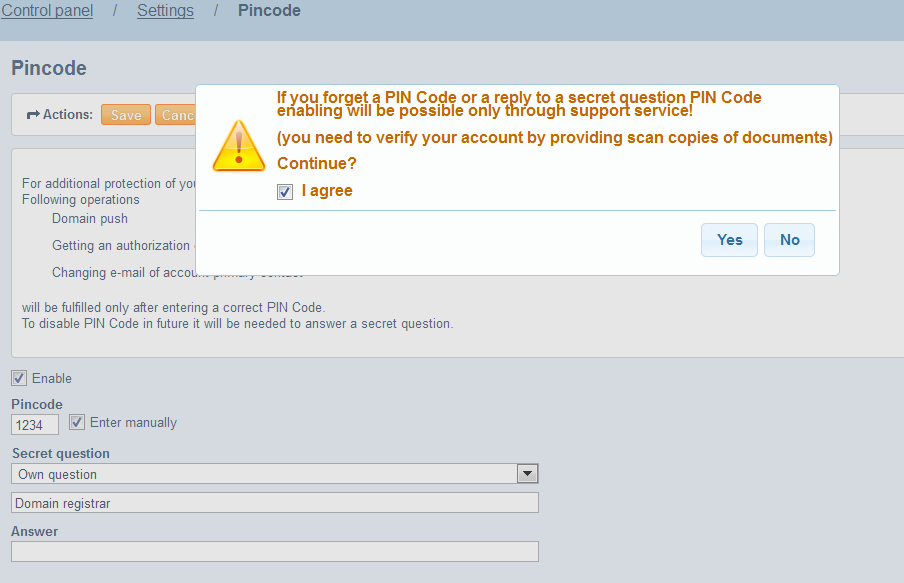
Carefully read the terms and conditions when activating this option. If you forget your Pincode, we will have to ask you to send us a photocopy of your ID for verification.
- How not to become a fraud victim when buying a domain
-
5 rules: "How not to become a fraud victim when buying a domain"
Anyone who delves into domain business a bit deeper than everyone else knows about the existence of the secondary market of domain names. Today this market is full of offers for various likes and tastes, starting with great and expensive domains and ending with trashy names that cost a couple of bucks. Of course, this market couldn’t have stayed ignored by fraudsters who are looking for enrichment possibilities at expense of others.
There are countless auctions and platforms that are protected. But practice shows that many customers disregard the safety rules to speed up the transaction, thus becoming fraud victims. Others don’t even know about the safety rules and because of that trust hackers with their safety and money. While we can’t give you advice on how to overcome greediness and impatience, we highly recommend following few simple rules that will ensure the safety of your domains and money.
Rule #1: Check the seller
Since all of the transactions take place in Internet, it is important to know who you’re dealing with. During the first contact with the seller, find out his nickname and ICQ number at forums. After you have gathered this information, use Google to learn more about seller’s transaction history. It is important to understand that if your seller has a recently created profile and poor transaction history, you probably should not work with him. The old account of this seller may have too many negative reviews from people that he fooled.
Rule #2: Make sure that the seller owns the domain
It’s funny how many times people buy stolen domains that are claimed by their real owners after the money is already paid. In every case the buyer has no one to blame but himself. Avoiding this type of fraud is simple. The only thing you have to do is ask the seller to upload a confirmation file to the website. This may be a photo or a text document with random content. It is also advised to check if the seller’s information matches the Whois data. If Whois protect is activated, ask the seller to turn it off while you check his personal information.
Rule #3: Know who you pay
Since WebMoney transactions have become a usual thing for CIS citizens, the first thing to pay attention to is the BL of seller’s wallet. Think twice or even cancel the transaction if your seller has a low BL level and a certificate that is lower than personal. It is possible that seller’s old wallet has negative reviews, similar to the first rule.
Rule #4: Use Escrow
If you are new to domain business and have no experience in purchasing or selling domains, you can use the Escrow service that is a secure third party that ensures the safety of your money. Don’t skimp on few cents that will go to Escrow while risking to lose all the money from your transaction.
Rule #5: Reissue the rights to domain
When buying a domain your desire to receive it asap is understandable, but it is important to remember that it is not enough to Push the domain to become its rightful owner. Without changing owner’s information you simply get the ability to control the domain. That is why the transmitting party needs to officially transfer the rights to domain using the registrar’s guide. Only after that you’ll become the rightful owner of a domain name.
- Using coupons
-
A coupon is a digital/letter code that can be used for receiving discount for purchasing, transferring or renewing a domain. It can be activated at checkout.
- Registering a mistake
-
If you participate in our private beta-testing and have found an error in the system, you need to create a ticket using the following template
Subject: Error’s summary.
Text: Indicate the order of actions that lead to the error. Also, make a screenshot of the error, upload it to any public photo hosting and include the link in the ticket.
Please make sure that the address link is visible on the screenshot.Example:
Subject: Bug: The VNC status doesn’t show.
Text: I have clicked on "VNC" action in server control window VDS123650, after "Time of your last login" field renewal login and password for access have not appeared. - What is Whois Protect
-
Domain registration is a simple and straightforward procedure that usually doesn’t cause any problems. However, when you fill in the registration data, meaning the personal information of domain owner, you risk becoming a target of spammers who collect this type of information for direct calls and spam newsletters.
We offer Whois Protect option to all our domain zones for security of your personal information. This option hides your personal information and shows Whois Protect information when someone makes a Whois inquiry.
Without WhoisProtectService
John Black
5285 Decarie Boulevard #100
Montreal, qc H3W3C2
Canada
+1.5144959001, Fax:+1.5144953105
johnblack@gmail.comWhoisProtectService
WhoisProtectService.net PROTECTSERVICE, LTD.
27 Old Gloucester Street
London
GB
WC1N 3AX
+44.02074195061
ahnames.me@whoisprotectservice.net
Thanks to email forwarding option people can contact you without knowing your personal email. The mail is redirected from Whois Protect domen@whoisprotectservice.net address to the address you have specified when registering the domain.
Whois Protect option is activated automatically when you register or transfer a domain. Deactivating this service is easy — all you have to do is unchecking the "Whois" checkbox.
- RCP control panel. Fast start
-
1. Creating an account
1. Creating an account
2. Adding a domain
3. Uploading website files
4. Adding MySQL database
5. Adding crons
6. Creating mailboxesTo start working with servers you need to create an account.
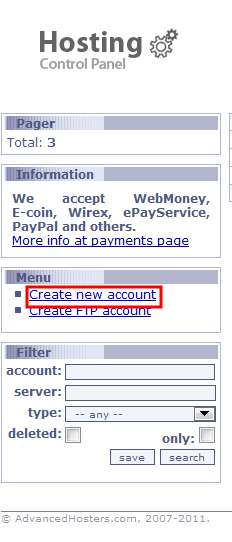
- Go to "Accounts" section and select "Create new account" (1):
- Fill in the fields and press [Ok]:

- Account’s name
- Password
- Client
- Server where you want to create your account
New account will be created within a minute. Please note! If you have several servers you may create an account on the wrong server.
Please note! In the future while working with the RCP panel you will need to work with hosting functional from the account panel. An account is created from the client entry and can be used to edit and create records. When using your client, you can view the records and perform financial operations only.
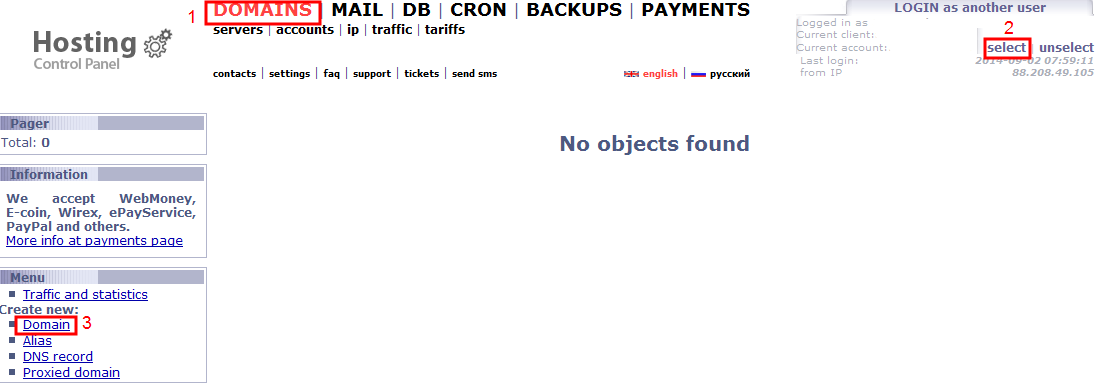
2. Adding a domainNext thing to do is creating a Domain in the control panel.
- Select the necessary account from the “Current account” field in the right upper corner of the screen.
- Log in to "Domains" section.
- Click on "Create new account" button on the left.
-
- Enter full domain name in the field "Domain" (1).
- If you don’t need a "www" domain support, uncheck the “Create www.domain” checkbox (2).
- Select an IP address for domain’s resolving (3).
- Configure backup frequency and click [Ok] (4).
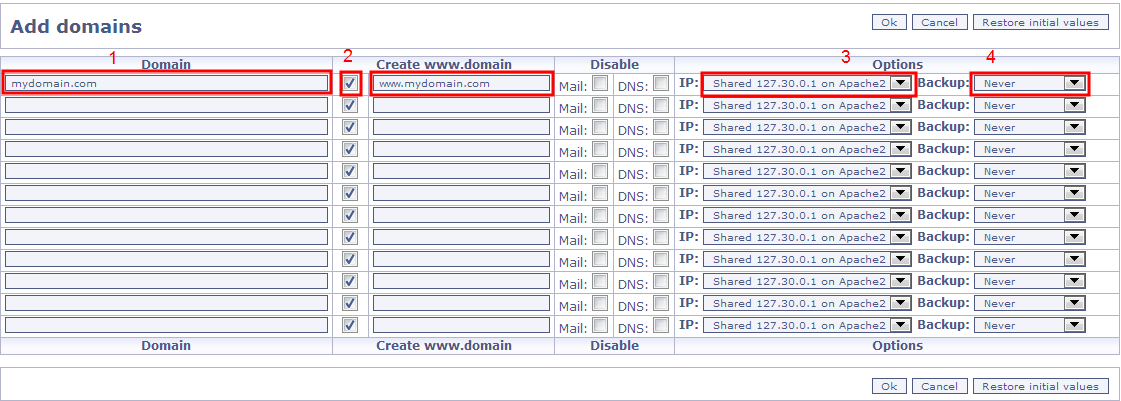 Domain will be created within a minute.
You need to write our NS-servers in the control panel of your registrar. For RCP control panel we use the following default NS servers: ns1.pub-ns.com, ns2.pub-ns.com.
3. Uploading website filesNow you need to upload website to hosting. To do that, use a FTP client, for example, Total Commander or Far Manager. You can find the FTP access information in our control panel in the "Accounts" section.
Select an account and click on "FTP/SSH access information" in the left menu. Please note that FTP access to all accounts is closed by default. To grant access, select the account that you want to work with in the left upper "Current account" menu, go to "Settings" and select the "Allowed IP addresses" menu. Write your IP address in the "To login to server via SSH/FTP" field. To grant access to your account via FTP for any address, write 0.0.0.0/0.
You need to upload website files to domain’s root directory after connecting to FTP. Simply open the folder with the name of your domain and copy all website files and directories to it.
4. Adding MySQL databaseFirst you need to create a general password to access all databases. To do so, select an account you want to work with. Log into "Database" section (1). Select the "Set common password for my MySQL database" (2). Enter the password and click [OK] (3). You’ll be able to login to any database using the common password and the name of your account.
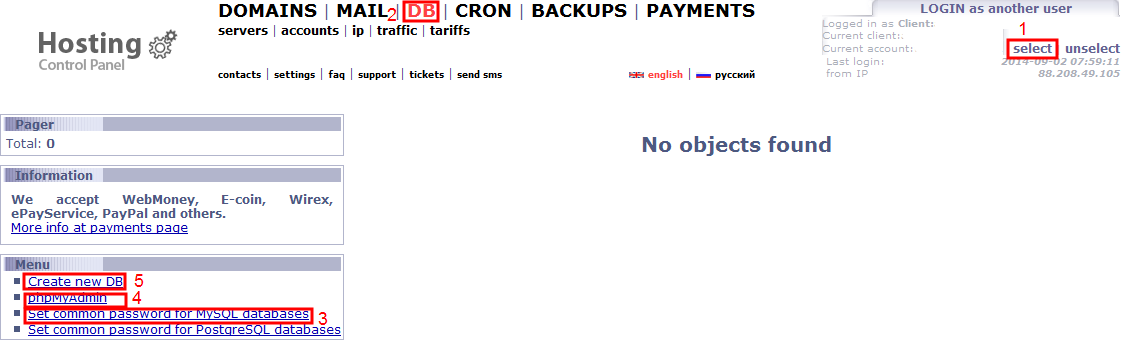
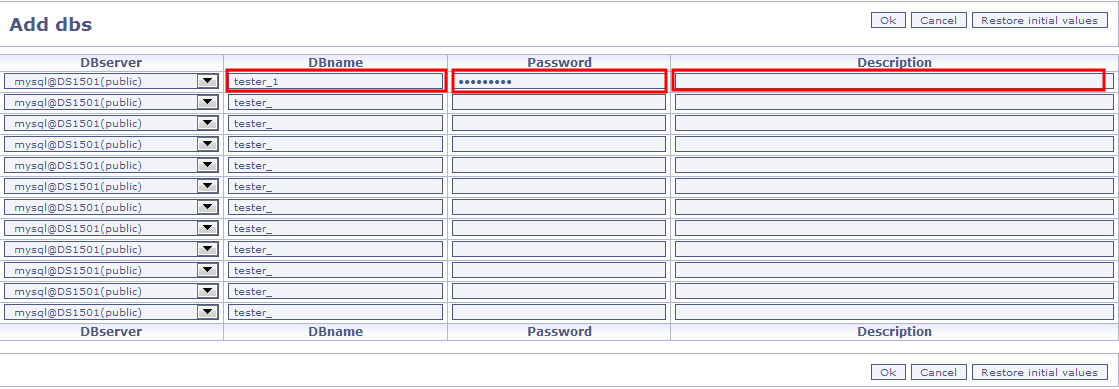
Next you need to create a database. Click on the "Create database" left menu(5). Enter the name in the "DBname" field (6) and the password in the "Password" field (7) and press "ok". Filling the "Description" field is optional(8). The database will be created within a minute.
You can manage MySQL databases from phpMyAdmin web-interface of the left menu. (5) You can manage one DB by entering its name as login, or manage all databases using the common password and the name of your account as login.
5. Adding a croneTo add crones, go to "Crons" section. Select an account you want to work with (1). You can add crons in two ways: the usual way (3) or using the wizard (4) (if you can’t create the execution frequency manually).
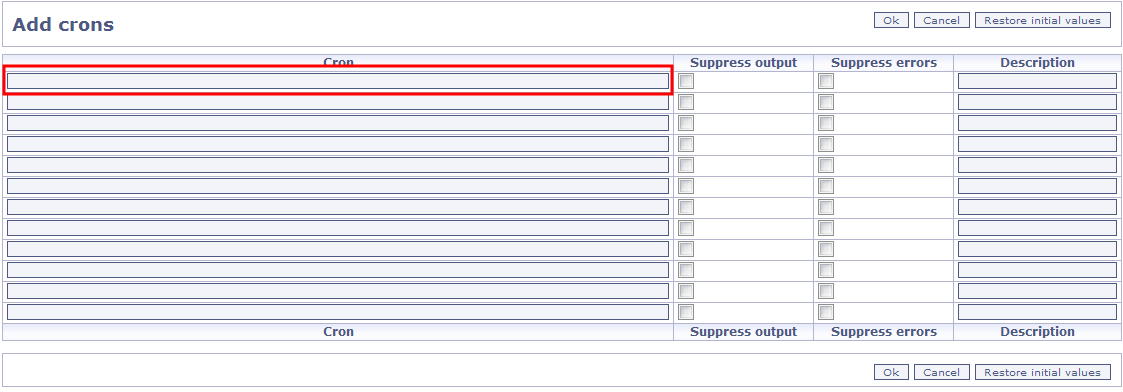
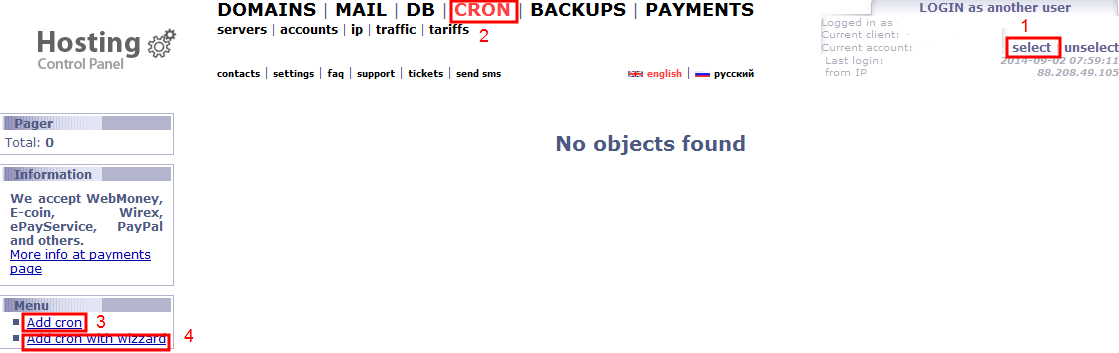 To add a cron the usual way, select the "Add cron" button in the left menu (3) and add the necessary line in the "Cron" field.
 You can also add a cron by using the wizzard. Click on "Add cron with wizzard" in the left menu (4) and select the frequency.
You can select various regimes by holding CTRL.
You can also add a cron by using the wizzard. Click on "Add cron with wizzard" in the left menu (4) and select the frequency.
You can select various regimes by holding CTRL.
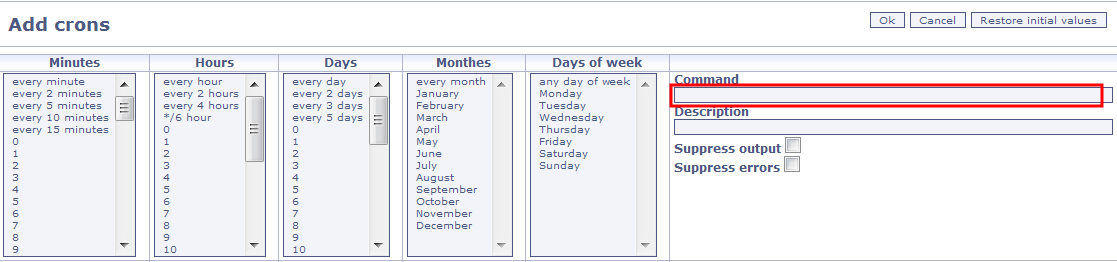 Write the command in the "Command" field, for example:
/usr/local/bin/php /home/firstacc/domain.com/cron.php
Always use full file path. There’s a "Set cron data" menu in the left side of "Cron" section. You can specify an email for sending errors and cron outputs. Write your email in the "Mail to" field and press "Ok". If you don’t need to receive emails with errors and cron outputs, select the "Suppress output" and "Suppress errors" fields when creating a cron.
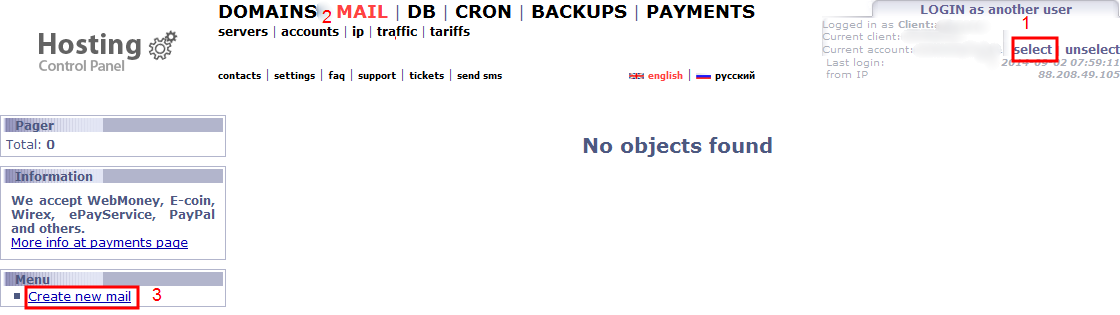
6. Creating MailboxesMailboxes can be created for your domains only.
Select an account you want to work with (1). Go to "Mail" section (2) and click on "Create new mail" on the left menu (3). Select the domain for which you want to create mail.
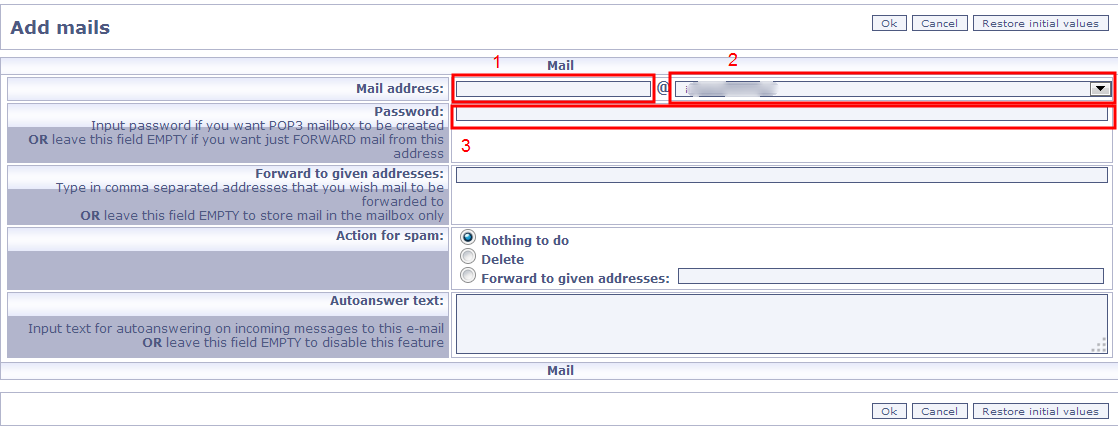
Enter the mailbox name in the "Mail address" field (1). Enter the password and click "Ok" (3). All other settings can be left unchanged. A mailbox will be created within a minute.
- AHnames control panel. Fast start
-
1. Creating an account
1. Creating an account
2. Adding a domain
3. Creating mailboxes
4. Adding databases
5. Adding crons
6. Configuring backups
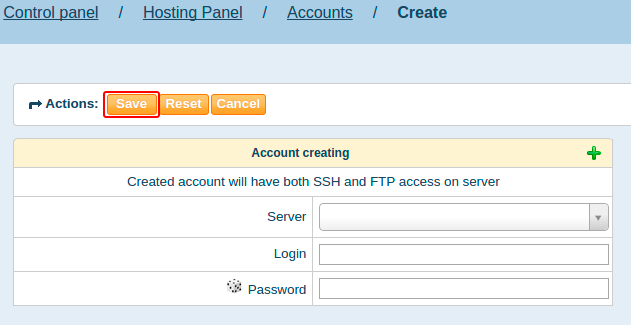
7. BackupsTo start working with server you need to create an account. To do so, when in AHnames panel, expand the "Hosting panel" list and select "Accounts". Click on "Create account" in the window that appears. Fill in the fields, write your name in the window that appears and click on "Save" button in the upper panel.
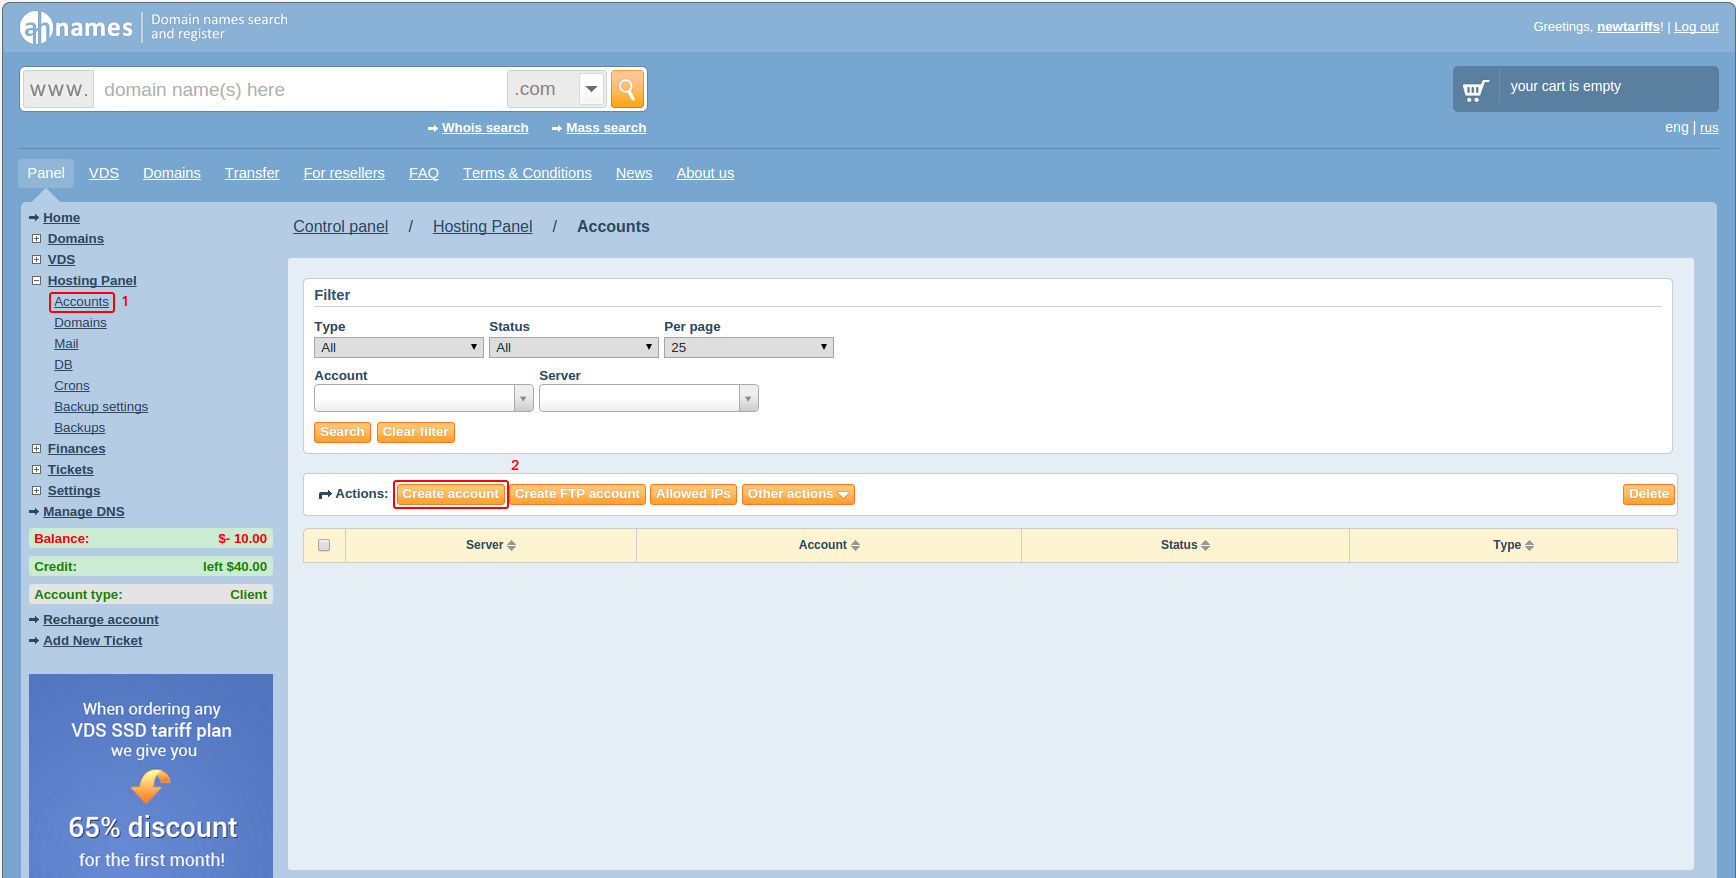
When account is created, you’ll see a notification indicating successful completion of the operation and account directory will be created in the /home folder.
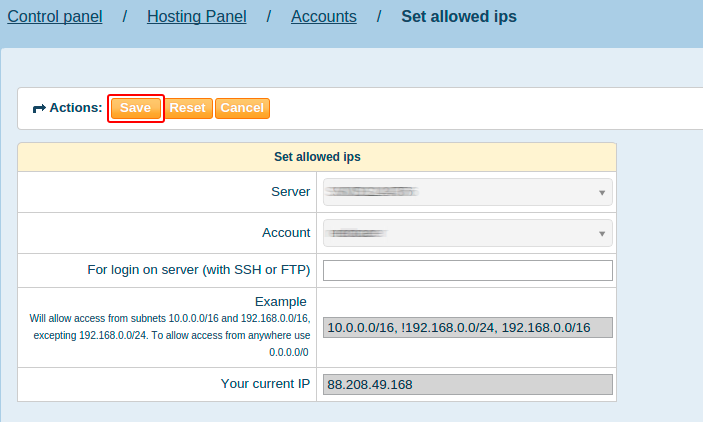
Use the name of the account as login to login via FTP and SSH. Access to account is limited to all IP addresses by default. This is done to protect your account. You need to indicate IP addresses that may have access to your account. To do so, click on the checkbox near the necessary account and click on "Allowed IPs" in the action bar.

Using the examples described in previous line, indicate the IP addresses that will have access to the account via SSH or FTP, then click "Save" in the top action bar.
 2. Adding a domain
Select "Domains" field in the "Hosting Panel" list. Select the necessary parameters from the lists in the window that appears and click on "Add domain" button in the action bar.
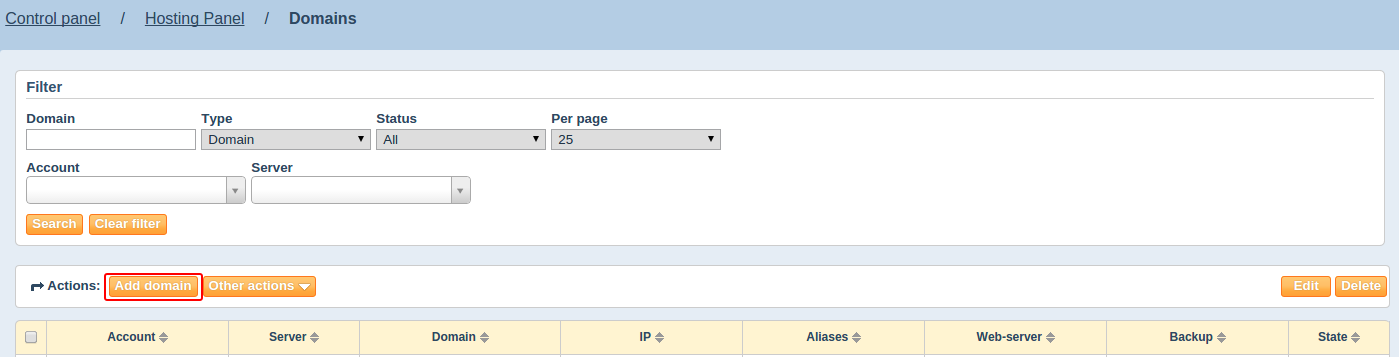 "Server" and "Account" fields will be filled based on the values you have selected in the previous window.
Write the full name of your domain in "Domain" field. If you need a "www" domain support, check the ""lncluding www" field. "Path" field is filled automatically
based on domain name. You can specify it yourself if needed. Select domain IP in the "IP" field.
"Server" and "Account" fields will be filled based on the values you have selected in the previous window.
Write the full name of your domain in "Domain" field. If you need a "www" domain support, check the ""lncluding www" field. "Path" field is filled automatically
based on domain name. You can specify it yourself if needed. Select domain IP in the "IP" field.If your resources contain a lot of statistics and you want to reduce the load on server, you can use the nginx — apache pack to proxy some part of requests. To do so, check the "Proxying" box and specify IP addresses that will be used for this action. (at least 2 IP addresses). Select domain backup parameters from the dropdown list. After all the necessary parameters are selected, click on "Save" in the action box.

After successfully adding all domains, they will appear in the list below the action bar. For a domain to start working on new VDS, you need to change its NS records by using the guide. Or indicate our NS records in the control panel of your current registrar.
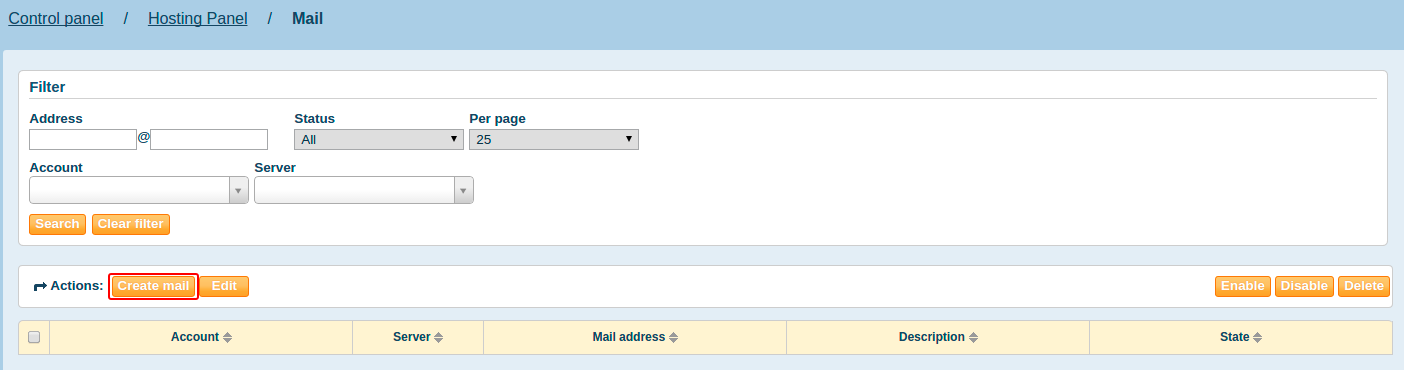
3. Creating mailboxesSelect "Mail" section in the "Hosting panel" menu of your control panel. To create new mailbox, click on "Create mail" button.
Select the necessary values from "Server" and "Account" dropdown lists.
Specify the mailbox name in the "Address" field.
Set the password for the mailbox in the "Password" field.
If you need redirecting, specify emails in the "Forward to" field. Select the most suitable "action for spam" field.
Fill in the "Auto reply text" if necessary.
Specify disc quota for new mailbox in the "Mailbox size, MB" field.
Click "Save" after filling all the necessary fields.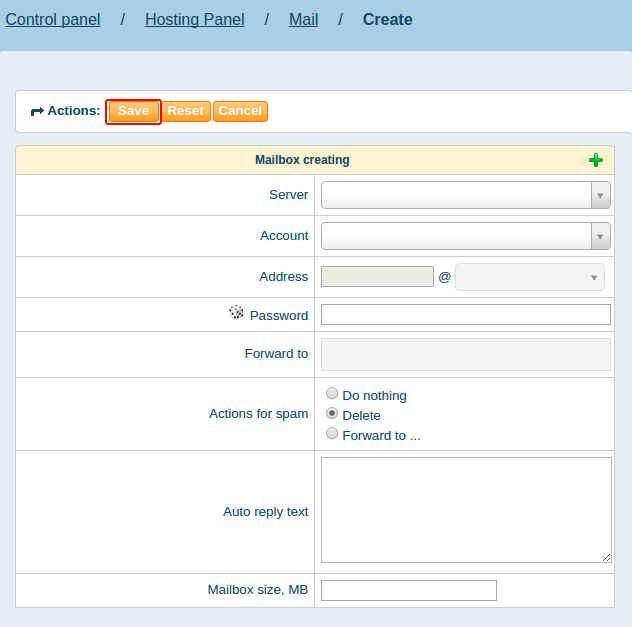
Please note that you can create mailboxes for connected domains only. Use the following pop and smtp parameters to connect mailboxes to mail clients:
4. Adding a database
mail.connecting.name — server for receiving mail
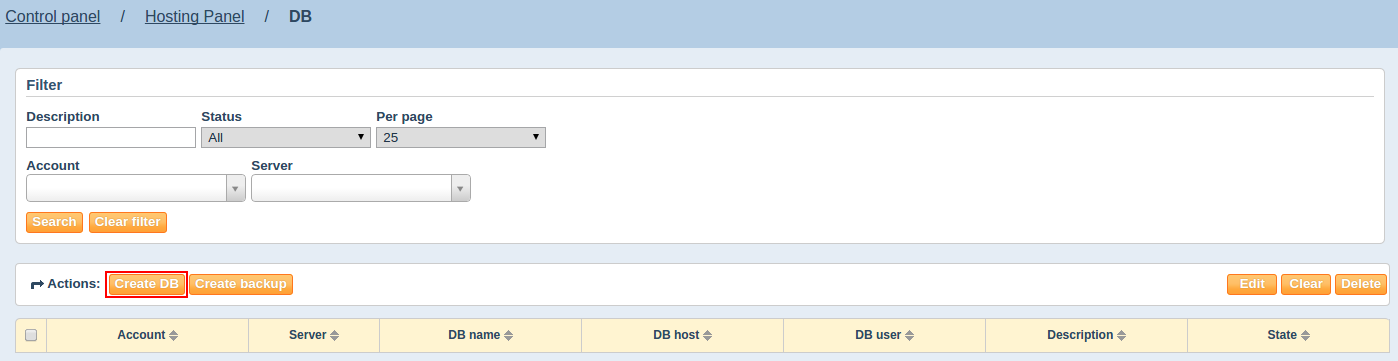
smtp1.connecting.name — sending mailSelect the "DB" field from the "Hosting panel" list. Click on "Create DB" in the action bar.
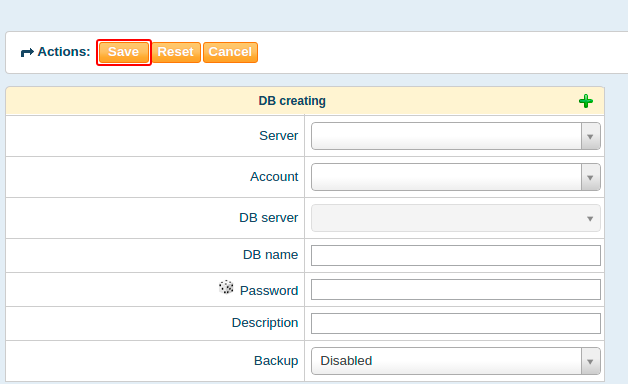
Select the necessary "Server" and "Account" values from the dropdown lists. Select mysql parameter from the "DB server" list. Create the DB name and password and choose backup settings. Filling "Description" field is not mandatory. Click "Save" after filling all the necessary fields. Database will be created automatically and you’ll see a pop-up notification.
 5. Adding crons
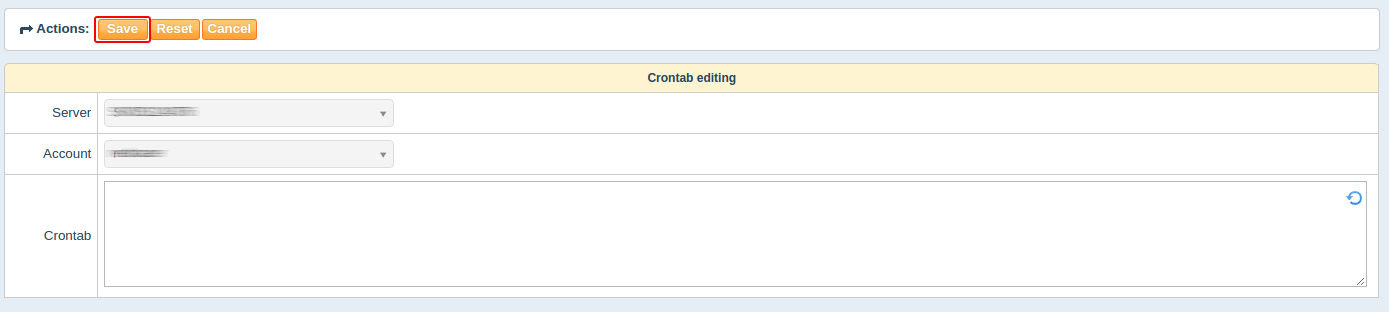
Select "Crons" field from the "Hosting panel" list. The list of created accounts will be available from new window. Select the necessary account and click on "Edit" button.

Write the necessary commands in the "Crontab" field in the "Crontab editing" window then click "Save" in the action bar.
 6. Configuring backups
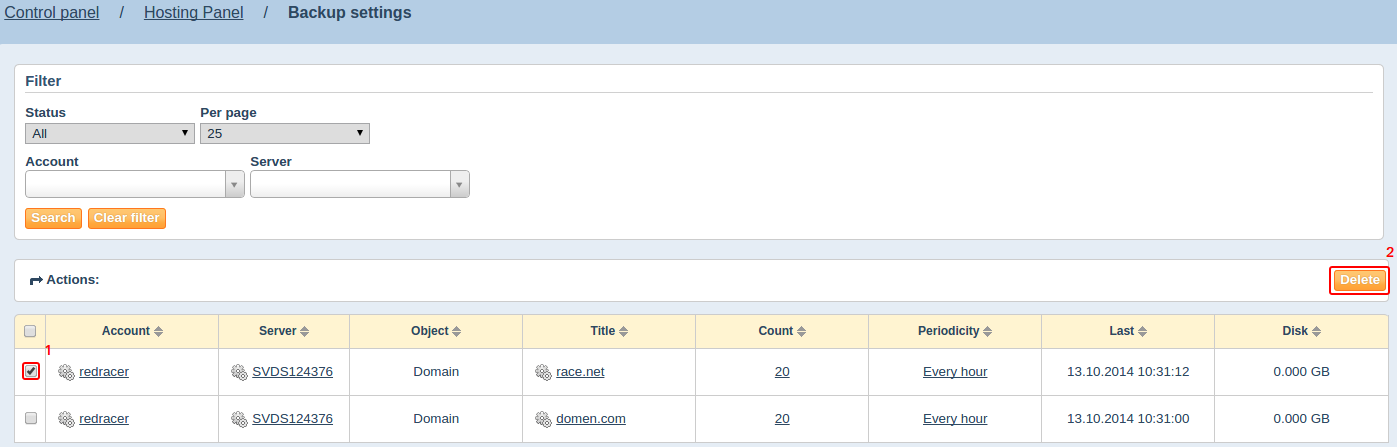
Select "backup settings" from the "Hosting panel" list. A list of all backed up objects will display in the window that opens. You can remove objects from this list if necessary by clicking on "Delete" in the action bar.
 7. Backups
Select "backups" from the "Hosting panel" list. Backups for all objects will be displayed in the window that opens. To avoid using too much space for backups, use "Time" and "Disk" columns to see which backup may be deleted. To delete it, click on "Delete" button in the action bar.